Toyota Tacoma Forum banner
Status
Not open for further replies.
81 - 100 of 150 Posts
Tacoma Skater's custom XtraCab box, sold off in spring 2007 ...
 

Attachments

Save
Re: Pre-05 Tacoma Extended Cab CUSTOM Sub Box (Loaded or Unloaded)

Here are some pics of kingstretch's XtraCab sub box (2003 Taco). He was selling this in August 2007.

Sale Thread: http://www.customtacos.com/forum/showthread.php?t=94943

Some basic descriptive points he wrote:

I built this sub box for my extended cab Tacoma. It was modeled after this box from SuperCrewSound. I (of course) think mine is better, the cutout at the bottom of mine better fits the contour of the floor. The riser at the back runs all the way across which I think adds to the stability. Also, my version is cut in half (each sub goes into a completely separate sealed box). This allows you to remove one if you need the space to haul the dog (or a person) around. You can also easily remove both. I mounted my amp to the outside of the box because my amp was too large to mount on the backside (I had hoped to be able to mount it on the other side of the wood it's on now). The carpet is gray. The box is constructed out of 3/4" MDF, held together with 2" screws, and all edges were covered with liquid nails to be sure it was sealed.

The boxe(s) are currently loaded with an Audiobahn AW1000 and an Audiobahn AW1000X. They are basically the same sub - just that one has a chrome ring. They are DVC 4ohm (wired down to 2ohm inside the box). I had originally planned to get flame grills for them both to make them match, but they are downfiring (hidden), so never bothered. I am willing to sell this loaded (with subs) or unloaded (without).

... The box was literally only installed in my truck for two weeks. I originally had them both installed, then pulled one out because it was a lot more bass than I expected (or needed - I guess I'm getting old). I was powering them off of a HiFonics Zeus Z400.
 

Attachments

Save
I just got my ported box done and took a few pics of it. Enjoy. Nothing special.

[The box is ...] It's not attached. The box and 12W7 weighs to much so I didn't bother bolting it down. Plus if I have an extra passenger I can push it to one side and use one of the rear seats.

Image
 

Attachments

ARCHIVE: Photos: XtraCab Subwoofer Setups

Here is a writeup and pics for an XtraCab sub install by TTORA member jessevic... The original thread over at TTORA is:

http://www.tacomaterritory.com/forum/showthread.php?t=24316

I'm 'transplanting' it to this CT XtraCab sub archive because it nicely illustrates an approach not often mentioned anymore - i.e., fiberglassing the OEM cubby hole(s) to accommodate a small subwoofer.


Well, I finally got around to putting a 10" Infinity sub in my truck. I had never done any glassing before, but I really wanted to keep both back seats useable, and have everything look stock. This was impossible with MDF. I know this is a 4x4 site, but I haven’t found a decent write-up yet so I figured I would give it a shot. I am sorry I didn’t take pictures during the installation, but I didn’t think it would have turned as good.

Installation:
1. I took out the back seats, belts, and drink holder thing. Pulled back the carpet, and unbolted the passenger side storage compartment. Taking out the passenger seat would have made the next few steps easier.

2. I taped off everything that would be covered in fiberglass. Basically the floor, rear wall, and passenger sidewall got completely covered in tape, creating a smooth area for the fiberglass. Because I wanted to pull the fiberglass mold out and finish it in the garage, I made sure there were any areas of the fiberglass that would get caught or bind on parts of the truck.

3. I then put on a thick layer of fiberglass, 2 layers thick on the three taped off walls. As i am not an expert with fiberglass, I wont get into details on how to use it. Its messy stuff, but if you take your time its not that bad. WEAR GLOVES. I think I went through 10 or 15 pairs of gloves throughout the job. Once they get a small rip, get a new pair or pay the price when your girlfriend wont let you touch her because you are "scratchy".

4. The next day I pulled out the hardened fiberglass mold. I decided I was going to make the top and front pieces of the box out of 5/8" MDF. I figured it would be stronger(and easier), as it did need to support the weight of the seat. I made a template out of cardboard, and transferred it to the MDF. Once I had cut the 2 MDF pieces to size, and adjusted them for a good fit in the cab, I attached them together. Glue and screws held the two pieces together.

5. Next I had to fit the fiberglass mold and the MDF together. I cut out a rough 9" hole in the MFD where I was going to put the sub. I used tape to hold the MDF and fiberglass mold in place with each other. Through the 9" hole in the MDF, I slowly laid pieces of fiberglass along the joint where the fiberglass mold met the MDF. About an hour later, I had completely covered all of the old fiberglass mold with another layer, and joined it to the MDF. I layered the fiberglass about 3 inches up the MDF, to assure there was adequate bonding between the two layers. Then I let it all dry.

6. A few hours later, I put on a few last pieces of fiberglass where I figured there might be weak spots. I took a paintbrush, and brushed resin all over the inside of the box to assure that everything was completely sealed. Some people then put on a layer of Rhino lining or line-x to help dampen the box, but I just opted for some fiberfill.

7. After letting it completely dry, and testing that it fit in the truck, I needed to make the 9” hole big enough to fit the sub. I wanted to be able to use the rear seat still, so I had to recess the sub flush with the top of the box. I cut the 9” hole to 10-1/2”. Out of a new piece of MDF, I cut a smaller ring 9-1/8” that would hold the sub. I then cut this ring in two pieces, passed them through the hole in the box, and screwed them to the underside of the box. Making a recessed shelf that the sub could sit in. The box was pretty much complete.

8. Installing the box was just a reverse of tearing the backseat appart, but you will need 2 wood screws to attach the drink holder to the new box. I am going to buy some carpet to completly hide the sub, but as I just finished work in it for the day, it can wait till tomorrow.

The Sub:
Because of how shallow the rear storage compartment of my Tacoma is, most of the subs I was looking at didn’t fit. I did some research, and found that JL, Infinity, and MTX, all make good sounding, shallow drive woofers. Due to reviews I read, and availability I chose the Infinity 1042w. It only needs 4-9/16” mounting depth, and an enclosure size of .75ft^3. I figured my box was approx .72^3 after filling it with packing peanuts and measuring them, and I had exactly 5” mounting depth to play with. Either way, it was very close to ideal.
 

Attachments

Save
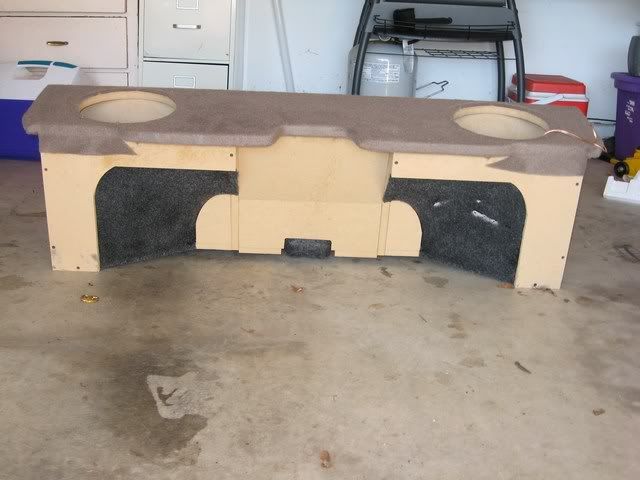
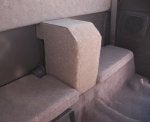
I might've put too much info into the title, but long story short I wanted bass and wanted to retain both of the jump seats, so my friend Mike (thanks man) and I took out the passenger side cubby shelf, cut a box out of MDF, and put in an 8" sub

making the box was a series of trial and error; starting with the floor of the enclosure, then cutting out pieces to fit around the humps and curves of the xtracab sheet metal

Image


for a sub, we chose an elemental designs 9kv2 because it performs well in a small box, we couldn't really fit a bigger sub using an mdf box, and can get them for a relatively good price ($75)

Image


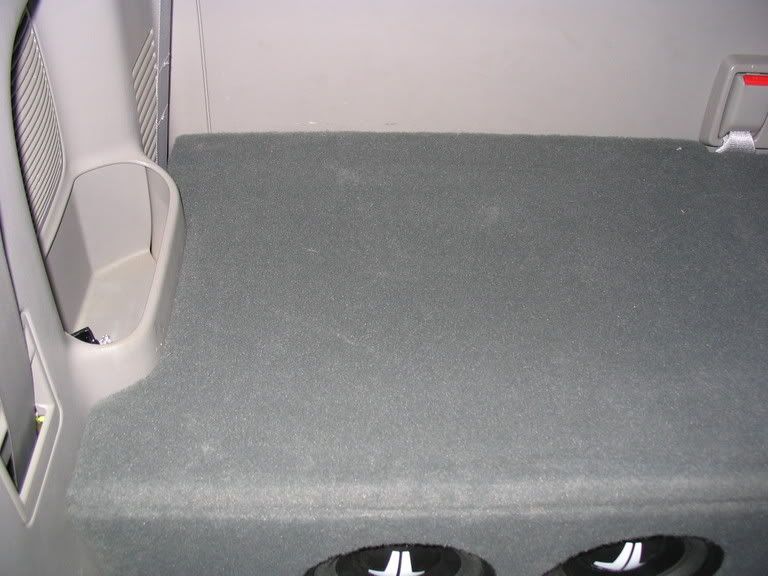
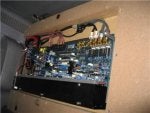
here is what the final product looks; note the sub is flush-mounted into a piece of 1/2" mdf and sitting on a "ring" which is internally braced for strength, and sealed off with liquid nails on the inside (and a little on the outside)

Image


here's the back side with the terminal

Image


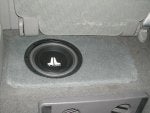
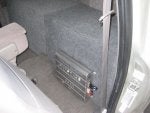
the sub fit was a little tight; I couldn't get the seat down all the way, and it sticks out a couple inches in front of where the cubby would've been, and we can't get it under the factory carpet

so we:
-made slits in the carpet so it could lay flat against the floor
-removed one of the cubby-hinge covers
-decided to carpet it for cosmetics sake.
-the sub sits pretty flush as it is, but I plan on putting a waffle grill on top for full protection later on

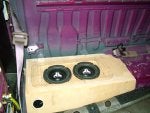
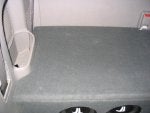
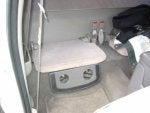
getting a carpet match is pretty much a crapshoot, so I just went into wal-mart and checked the auto, bath, rug, and home sections in search of something nice

the best I could find was a nice micro-fiber throw towel, which I felt bad about cutting because it was so soft- $8

Image


I used a spray adhesive to stick it on, but lost all motivation and patience once I got the top and front covered....so I just cut off the excess and stuffed the rest underneath the box

here's how it came out (the color match is accurate in the photos, but you can't see the plush nature of the fabric)

Image


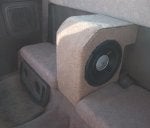
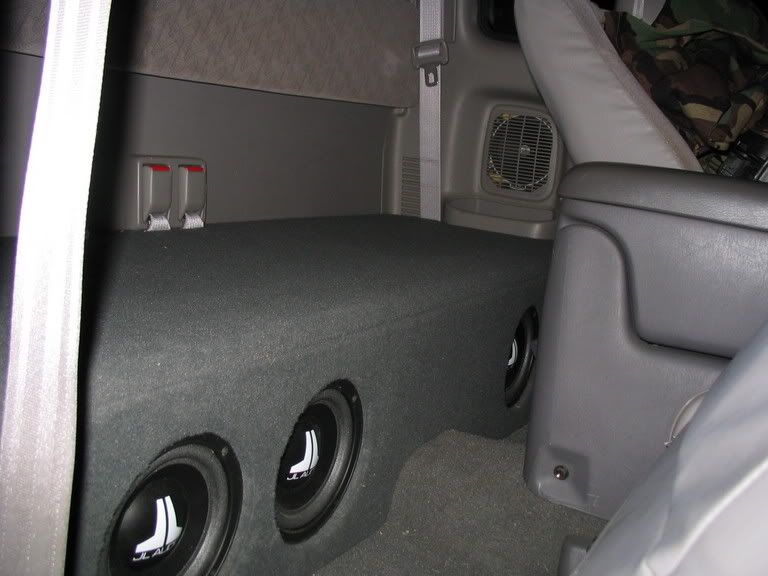
I don't mind that the box didn't go all the way to the back of the truck because I can still fit my spare tire tools behind it

and in this side shot you can see where I half-assed the carpeting

Image


Image


let me know what you guys think

we might end up glassing the sub for a tighter fit, so if anyone's interested in the box down the road, let me know
 

Attachments

Re: 97 xtracab 8" sub, mdf cubby replacement, and carpeting, pics

so I also sent this thread to my friend to look it over and all he said to me is:

friend: "so the seat's not flush?"

me: "no, but if you put weight on the seat, it'll sit flush"

friend: "hmm...ok"

determined to keep my attention to detail, I went back in and evaluated the situation.

my first problem is that the carpet was folded over, making a gap between the box and the transmission hump

Image


luckily, carpet is pliable, so I took the first thing I could find (the excess microfiber throw blanket) and started "stuffing" the gap until the carpet sat up higher, keeping the horizontal level relatively equal, and pushing up against the box to fill the gap and appear more continuous

Image


I then yanked, pulled, and wiggled the metal bracket on the seat mount until it raised the hinge juuuuust enough for me to put the cover back on, and get the seat to sit level

result? the seats sit flush :)

Image


Image


that's why it's custom tacos baby :waytogo:

Image
 

Attachments

Attachments

Save
Re: ARCHIVE: Photos: XtraCab Subwoofer Setups

Here (attached) is a set of photos from a recent eBay auction. They illustrate another custom-built pre-2005 XtraCab cubby sub enclosure (that I'd never seen before on any Taco forum).

Here's the auction description of the setup (with dimensions):

"Rockford Fosgate Z series sub 4 ohm 150 watts/400 peak watts.* It was in my 2002 Toyota Tacoma.* I made a custom MDF and Fiberglass*box that*replaces the*rear extra-cab*cargo door on the passenger side floor.* You do have to remove the door and trim ring.* It takes up no space and you can still fold down seat and sit on speaker.* Use caution when folding seat and sitting.* The sound is also reduced when seated. ... 18 1/2" long, 9 5/8" wide, and 5 1/2" deep at deepest point. "
 

Attachments

Save
Re: Custom Sub Box for Tacoma Extended Cab

Custom back bench built for Subs in a 2001 Tacoma. It was professionally built at Hear No Evil in Salem, OR. It was carpeted to match interior. It holds 2 10" subwoofers, while allowing you to keep your back seat for seating. It fits in there perfectly, no need to bolt it down, the weight of the box keeps it down. There is a cubby for the seatbelts to be remounted because the box covers up the factory mounted spot.

Image


Image


Image


Image


Image
 

Attachments

Save
Re: Show off your custom interior and/or system

Here are photos of CT-zen gastafalo_bob's sub box built for and installed in his 2001 S-Runner.
 

Attachments

Save
Re: ARCHIVE: Photos: XtraCab Subwoofer Setups

Here (attached) are some photos from speedemon55's (TTORA) sub installation.

I did a similar thing with mine. Made a fiberglass box and dropped a 8" JL w3 in. Plan another one in the future for the other side, cuz I like a little more bass. Went from two 12's to one 8.
SOURCE: http://www.tacomaterritory.com/forum/showthread.php?t=14224
 

Attachments

Save
Re: ARCHIVE: Photos: XtraCab Subwoofer Setups

Here's a photo of NisAznMonk's (TTORA) sub install.

This is a box that was done a few months ago, and I just happen to find it in my computer. Like the forgetful idiot that I am, I forgot to take the finished pics. Anyways, this is a pretty good representation of what could be done in an Xtra cab. The subs in there are JL Audio 6w0's, and this ported setup sounded really good. It won't win any SPL contests, but for everyday listening it was great.

The only problem we had later was that the dustcap came unglued, which I found out later is a common problem with the JL's. They ended up getting replaced by a pair of Digital Designs W6.5LT.

After it was covered with matching carpet, the seat folded down like normal and there was no loss in space. If anyone here in Houston wants something like this, just PM me.
SOURCE: http://www.tacomaterritory.com/forum/showthread.php?t=14224
 

Attachments

Save
Re: ARCHIVE: Photos: XtraCab Subwoofer Setups

... And here are some pics of bradleyem's (TTORA) sub install in the side panels of his 1995.5 Tacoma XtraCab ...
 

Attachments

Save
(From the For Sale thread: http://www.customtacos.com/forum/showthread.php?t=107383 )

... Here's the specs.

10 inch Rockford Sub with Custom sub box seen. As of right now it's still in my truck so immediate shipping is not a possibility, but I could have it pulled out within the week.

The sub is a 10 inch Rockford Punch HE2 Dual voice coil. It's about 6 years old, but has never been pushed and is not blown by any means. I just don't want the box in the back seat any more.

The box is made of 3/4" MDX that's glued and screwed at all the joints and is sealed with 3 coats of urethane. It bolts to the floor of the cab inside the box so to remove or install the box your must remove the sub so it makes it tough to steal cause it's going to take a bit longer without tearing something up. The only thing the box needs to be perfect is a proper terminal setup in the back. Right now I just have a small hole drilled with the wires run through it and sealed them in with silicon. Works fine as is or it'd take no time to install terminals. The box is totally sealed and I don't know the volume. It hits pretty solid, but if you want to go to the south side and bump with the homees this isn't the setup you want, but if you want clean and tight sounding base then it's a pretty slick setup that enables you to still use both back seats. What you see in the picture is what you get. Any questions, just ask.

The front seats still have full range of sliding motion, but do not not recline back quite as far, but unless you drive like a gangsta or are 7 feet tall then it shouldn't effect you.

...

Image
 

Attachments

Built it yesterday. Im putting an Alpine Type-r (12") in there. That is with seats all the way back on the rails as well.
 

Attachments

It was important to me to keep the back seats usable, so I decided on a center console/armrest type box. I didn't need anything more than an 8" sub, so I had enough space to work with. It's a little rough and the carpet isn't an exact match (I didn't feel like browsing more than one store), but this is definitely not a show truck so that's ok.

I chose a Rockford Fosgate Punch P300-1 amp, and for the sub, I went with a JBL GTO804.

The recommended sealed volume for the sub is .30 cu.ft., and the box comes in at .32 cu.ft.

The odd shape of the box allows for the seat belt buckles to stay in their stowed position. And I have to say, being only an 8 incher, it hits a good deal harder than my previous 10.

Image


Image
 

Attachments

t...

I built this enclosure the end of summer, 2005. The top, front, back and sides are 3/4" MDF, bottom is 6 layers of fiberglass mat and cloth. It holds 4 JL 6WO's, and 2 Xtant 403a's. The amps are recessed into the top of the enclosure. There is a carpeted trim plate on top of them, the part above where the amps sit the MDF cover is cut away and replaced with heavy gauge steel mesh to help with airflow, though I've never had a problem with the amps getting hot. Both carpeted pieces you see are removable trim plates, if you have oak interior, its as easy as removing both plates and re-carpeting them to match... The subs were purchased new from Tweeter in Lawrenceville NJ and the amps came (brand new, not refurbs) from sounddomain.com. The amps were discontinued when I got them, so I got a decent deal on them. I have had the covers removed the whole time I had them so they are still in brand new shape with the white vinyl coating still on them. I think I have the original boxes and probably original receipts...

My whole idea behind this enclosure was keeping it stealth, while still being able to use the back seats...

I'd like to keep everything together, the recesses in the enclosure were made for these amps, though im sure some others would fit, these just make sense for this set-up. I think all in all the whole shabang cost me around $1250 to build, ....

...
Image


Image


Image


Image
 

Attachments

Re: Subs, Amps, Custom Enclosure from 03 Xtra

For archival purposes ... Here are bruciep07's additional photos of May 29 2008 as attachments ... (9 total; 2 installments required ...).

Installment #1 ...
 

Attachments

Save
81 - 100 of 150 Posts
Status
Not open for further replies.
You have insufficient privileges to reply here.